

Installing a garden fence may seem like a complex task, but with the right preparation and materials it can be a straightforward project. This beginner’s guide walks you through the essential steps, from measuring the area to attaching fence panels, and offers practical tips to help you achieve a neat, durable boundary. By following these steps, you’ll understand How to Install a Garden Fence – A Beginner’s Guide that covers everything from fence posts to decorative gates.
Why fence a garden and what to expect
A well-chosen fence does more than mark boundaries. It provides security, privacy, and a defined space for garden beds, little ones, and pets. In this guide, we’ll focus on standard techniques and common materials, so you can approach the project with confidence. We’ll also touch on popular features such as decorative fence panels and decorative garden gates that can elevate the look of your boundary.
Key topics we’ll cover:
- Accurate measurement and planning
- Choosing posts, gravel boards, and panels
- Post installation with postcrete or concrete
- Attaching fence panels or feather edge boards
- Timing considerations, including the benefits of March for DIY fencing projects
Measuring the area and planning components
Before you buy anything, precise measurements are essential. Start by marking the proposed boundary with canes or spray paint, then measure the total length. Accurate measurements help ensure the correct number of fence panels, posts, and gravel boards are purchased, avoiding wasted trips to the shed or supplier.
- Measure straight runs and any corners, gates, or slopes.
- Decide on panel height. A common choice is 6ft fence panels for substantial privacy, but you can opt for shorter designs if you prefer a lighter boundary.
- Plan for gates: If you want access points, consider decorative garden gates or traditional garden gates that match your fence style.
- Check for underground utilities or irrigation lines before digging.
With the length in hand, you can determine how many components you need:
- Fence posts (usually one post per panel, plus ends and corners)
- Fence panels or feather edge boards
- Gravel boards to sit underneath the panels
- Concrete or postcrete to secure the posts
Selecting materials: posts, panels, and gates
Choosing the right materials is critical for stability and longevity. Here are common options:
- Fence posts: Treated timber posts are standard, offering durability and ease of installation. Depending on your climate, consider 4×4 inch or 100×100 mm posts for robust support.
- Postcrete or concrete: Postcrete (rapid-setting concrete) is convenient for DIY projects, while traditional concrete mix provides maximum strength. Follow the manufacturer’s instructions for mixing and curing times.
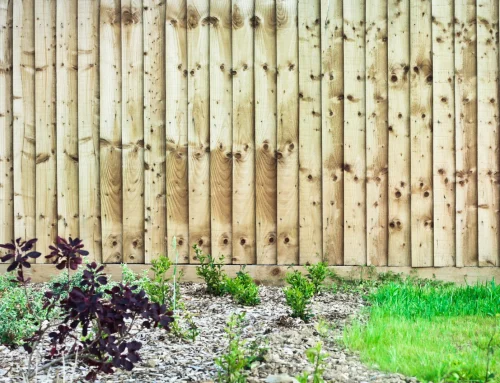
- Fence panels: 6ft fence panels are a popular, balanced choice for privacy without overpowering a garden. You can opt for standard solid panels or go for decorative options that suit your taste.
- Feather edge boards: These boards create a traditional, rustic appearance and can be used on one or both sides of the fence for a neat finish.
- Gravel boards: Placed between the ground and the panels, they protect the panels from ground moisture and extend fence life.
- Gates: If you need access points, decorative garden gates or traditional garden gates can complete the look. Ensure the gate width aligns with your fence line.
Preparing the ground and setting posts
March is a popular time for DIY fencing projects, as the ground is often softer following winter rainfall, making post installation easier. Here’s how to proceed:
- Mark post locations: Space posts according to your panel width. For 6ft panels (about 1.8 meters), a 1.8-meter spacing is common, but always confirm with your chosen panel size.
- Digging holes: Use a post hole digger to create holes about one-third to one-half the length of the post, depending on soil and travel. A typical hole is around 600–750 mm deep for a 1.8-meter fence in moderate soils.
- Add gravel at the bottom: A few inches of gravel improves drainage and helps prevent water from pooling around the base.
- Set the first post: Place the post in the hole, use a spirit level to ensure it’s vertical, and backfill with soil or low-soil concrete to hold it in place briefly.
- Gradual alignment: Repeat for each post, using a string or a mason’s line to keep posts aligned in a straight line.
Pouring postcrete or concrete
Secure posts firmly by applying postcrete or concrete. The process is relatively simple but requires patience:
- Insert the post into the hole and check vertical alignment again.
- Mix postcrete or concrete according to product guidelines.
- Fill the hole around the post in layers, tamping lightly to remove air pockets. Leave a small gap at the top for final backfill.
- Add a watertight finish by slightly sloping the top away from the post to prevent water pooling.
- Allow to cure fully before attaching panels. Curing times vary by product; typically, 24 to 48 hours for initial set, with full strength taking longer in cooler or damp conditions.
Attaching panels, boards, and decorative elements
With posts secure, you can begin attaching the fence components:
- Attach gravel boards: Position gravel boards on the ground-side of the fence to protect the panels from moisture. Secure them with screws into the posts.
- Fit feather edge boards or panels: Start at a corner or end post. Use ring-shoed or stainless screws to fix panels to the posts. Ensure boards are level and evenly spaced.
- Align the boards: Use a spirit level to confirm each panel is plumb and straight. If using decorative fence panels, ensure the decorative features face outward for best aesthetics.
- Gate installation: If you’re adding a decorative garden gate, ensure the gate hinges align with the posts and that the latch aligns with the gate frame. A well-fitted gate improves security and privacy.
Finishing touches and maintenance
- Seal and treat: If your fence is timber, consider applying a sealant or paint to protect against weathering and extend life.
- Check the structure: After installation, inspect for any loose screws or panels. Reinforce as needed.
- Ongoing maintenance: Remove debris, prune nearby vegetation that might press on the fence, and re-treat timber every few years.
Installing a garden fence is a satisfying DIY project that pays off with years of privacy and boundary definition. By carefully measuring, selecting the right fence posts, panels, and gates, and following a structured installation plan, especially during favourable months like March, you can complete the project efficiently. Whether you choose standard 6ft fence panels or decorative garden gates to add flair, a well-constructed fence improves security, aesthetics, and value. As you embark on How to Install a Garden Fence – A Beginner’s Guide, remember that preparation, patience, and attention to detail are your best allies.