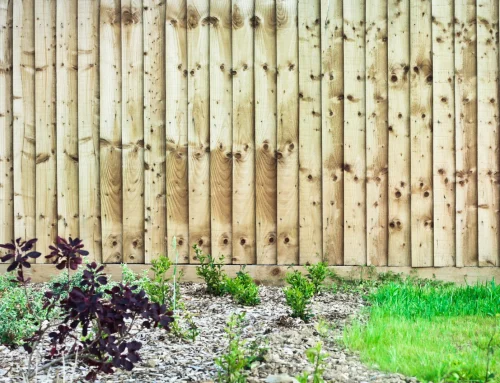


A fresh timber fence is a significant investment, and the way you treat it in the first few months will influence how long it lasts. This step-by-step guide walks you through the essential steps to protect your fence from the harsh elements and keep it looking great for years. By following these steps, you’ll maximize longevity and minimize maintenance, all while using practical, easy-to-follow methods.
Why the initial treatment matters
When you install a new timber fence, the wood is at its most vulnerable. Fresh-sawn timber contains a lot of moisture, and without proper treatment, this moisture can lead to warping, rot, and early colour fading. The treatment you apply during the first months creates a protective barrier that guards against UV rays, moisture, and mildew, extending the life of your investment. In this guide, we’ll cover the key steps from letting the timber settle to committing to a regular re-treatment schedule.
Let it settle
If your fence has just been installed, give it two to four weeks to settle and begin drying out before applying any treatment. Fresh-sawn timber has a high moisture content and won’t take up treatment properly until it’s had time to dry. During this window, avoid staining or sealing. This pause allows the wood’s natural moisture to balance with the surrounding environment, ensuring better absorption of your chosen treatment later.
- What to watch for: cracks developing from uneven drying and any visible moisture on the surface.
- Why it matters: applying sealant too early can trap moisture, leading to finish failure or patchy absorption.
Check the weather forecast
Apply fence treatment on a dry day when rain isn’t forecast for at least 24 hours. Ideally, choose a mild, overcast day. Direct sunlight can cause treatment to dry too quickly and reduce penetration, leaving you with a thinner, less protective film.
- Best conditions: low humidity, mild temperatures, and no precipitation for at least 24 hours.
- What to avoid: hot, sunny days or days with a forecast of rain, which can shorten drying time and compromise absorption.
Clean the surface
Even on a new fence, give the boards a quick brush down to remove dust, sawdust, or loose fibres. This helps the treatment absorb evenly and prevents gritty patches from forming.
- How to clean: use a stiff brush or broom to remove loose debris. If there’s stubborn residue, a light wash with water may help, but avoid soaking the wood.
- Why it matters: a clean surface improves adhesion and colour uniformity.
Apply the first coat
Use a wide brush or a fence paint roller for large flat areas. Work the treatment well into the grain, paying extra attention to cut ends. Cover posts and gravel boards too, as these areas are particularly vulnerable to moisture ingress.
- Technique tips: apply evenly in long, smooth strokes, following the wood grain. Don’t overload the brush; apply thin, even coats.
- Coverage expectations: read the product label for coverage rates and recommended thickness.
Allow to dry fully
Check the product instructions for the drying time; most treatments need at least 4–6 hours between coats. Don’t rush this step. If you apply a second coat too soon, you risk tackiness, poor adhesion, and uneven finish.
- Practical checks: the surface should feel dry to the touch and not sticky before proceeding.
- Environmental factors: cooler or humid conditions may extend drying times, so plan accordingly.
Apply a second coat
A second coat significantly extends the life of the treatment. Focus on any areas that seemed to absorb a lot of the first coat, as these are the most porous and most vulnerable spots.
- Where to emphasize: cut ends, joints, and any exposed or end grain.
- Result: deeper colour, better water repellency, and longer-lasting protection.
Going forward – maintenance and re-treatment
Re-treat every one to two years, or sooner if you notice the timber looking faded or dry. A fence that’s well-maintained will last far longer than one left to the elements. The right maintenance schedule depends on factors like climate, exposure, and the product used. Keep an eye on surfaces for signs of wear, such as colour fading, excessive moisture absorption, or mildew.
- Seasonal checks: inspect after heavy rain or long dry spells to decide if another coat is needed.
- Product choices: select a UV-stable sealant or stain designed for exterior timber, compatible with garden exposure and foot traffic.
Choosing the right products – what to look for
When selecting a treatment, consider water-based versus oil-based formulations, UV resistance, and ease of reapplication. Read product labels carefully and choose a solution suited for exterior timber fences. Some products offer enhanced mould resistance, fade protection, and quicker drying times, which can be advantageous for busy households.
- Water-based vs oil-based: Water-based products tend to dry faster and have lower odour, while oil-based products may penetrate deeper but take longer to dry.
- UV protection: High SPF or UV inhibitors reduce colour fading and wood degradation.
- Reapplication guidance: Some products require annual maintenance; others are designed for longer intervals between coats.
A fresh timber fence is a significant investment, and the way you care for it in the first few months sets the tone for its longevity. By letting the timber settle, checking the weather, cleaning the surface, applying the first and second coats properly, and planning a regular re-treatment schedule, you can maximise durability, appearance, and value. The process is straightforward, but attention to detail matters: dry wood, clean surface, thorough application, and adequate drying time all contribute to a robust protective barrier. With consistent care, your fence will stand strong, look attractive, and resist the elements for years to come Empress Fencing.
Please check out our 6ft fence panels, decorative fence panels, decorative garden gates and fence posts range for more information.